But wait… who am I to tell you about travel blogging?
Well, here at Indie Traveller I’ve been doing it for over 10 years!
I started blogging just for fun, but things kind of escalated. Just two years in I became a full-time professional travel blogger.
But my one regret from my early blogging days is that I hadn’t taken the setup process seriously. I didn’t consider the possibility I might want to make money with it later, and so I ended up with a technical mess that could have been avoided easily. This guide is about not making the same mistake.
Firstly, I didn’t start my blog on WordPress, which was highly unwise as it’s the most common blogging system. Even worse, I set it up on a crappy free hosting service (which is definitely a bad idea). Embarrassingly, I also didn’t start my blog on my own domain (more about that later).
I definitely paid the price when my blog started taking off. Literally, in fact, because migrating my blog over to WordPress and a proper hosting service cost me over $2000 in billing from a technical expert who had to help me do it.
So, let’s do this better.
By taking just 10-15 minutes you can set things up properly right away. This will make the blog way easier to update, easier for people to find, and will let you earn money from it in the future.
Even if you’re going to blog just for fun, these steps will be highly worth doing.
While you can certainly use free blogging services for a travel blog, this tutorial will show you why spending just $3 per month on a proper setup can be hugely beneficial down the line.
Let’s go!
Why you shouldn’t wait to launch your blog
First things first: my advice to new bloggers is to have a live (publically accessible) blog ASAP.
Even if you don’t think you have enough content yet, it’s better to just put what you have live where it’s visible and indexable by Google.
You’re honestly not going to have much (or any) traffic in the first months anyway, but it’s worth launching quickly for an important technical reason.
The longer your blog and domain name exist, the better it is for the algorithms.
Most blogs don’t get that much traffic in at least their first 6 to 12 months, but that’s because they’re still in Google’s so-called ‘sandbox’. This is a period during which Google is still watching your site but not yet ranking it much. A lot of people don’t know about the sandbox and get frustrated, but it’s really there to avoid spam sites and such from getting into Google too easily.
Until Google trusts your site, you’ll basically be put in a waiting room. So launching your blog early means you’ll get out of the sandbox sooner — which is when many more people can discover your blog and you can start growing your audience.
This is why just having your site and domain up with a couple of articles is hugely valuable in getting to that point. Since most people come to blogs via search engines, this is really fundamental.
I made the mistake of holding off for six months, just creating content while I was travelling, but not putting it out there yet. That basically delayed everything by half a year.
When you have a domain name it also accrues a metric called “domain authority” the longer it is live, giving you more chance for your articles to be recognized by search engines. More on this later.
The best blog platform to use
Even if you just want to blog for fun, it’s important to future-proof it.
It’s wise to ensure the foundations of your blog are solid. That way you can monetize or develop your blog later without any major headaches.
For this reason, I do not recommend using free services like Medium.com or other such social blogging platforms.
Why? You simply won’t control your own content. For example, on Medium you have to give a perpetual (i.e. unlimited) license for the content. They will, in a sense, own your work. You also can’t monetize it, and the platforms can change the rules at any time. Not good.
Also, avoid Squarespace or Wix. I know, they’re sponsoring just about every podcast or YouTube channel these days, which makes it seem like they’re the best thing since sliced potatoes. Honestly, they are pretty easy site builders that are good for making a portfolio site or, say, promoting a small business like a restaurant.
But they’re terrible for a content-driven travel blog.
The software that basically 95%+ of bloggers use is WordPress. It’s simply the blogging platform.
You can expand it with thousands of useful plugins and themes, many of them completely free. If you want to use external services in the future, such as for a mailing list, you can be almost 100% sure it’ll work with WordPress.
It’s key to have your own installation of WordPress on your own site (this is called “self-hosted WordPress”). This ensures you can do anything you want in the future, such as including advertising or sponsorship, without any terms & conditions ever stopping you.
Coincidentally, that’s exactly what we’ll be doing in this tutorial!
Note: if you get only the cloud version of WordPress at WordPress.org, you can’t monetize anything on your blog (you’re forced to only ever show WordPress ads). That’s why I’ll be showing how to set up the self-hosted WordPress, which lets you do anything you want.
Step-by-step: setting up your travel blog
Alright, here we go… I promise this will be easy!
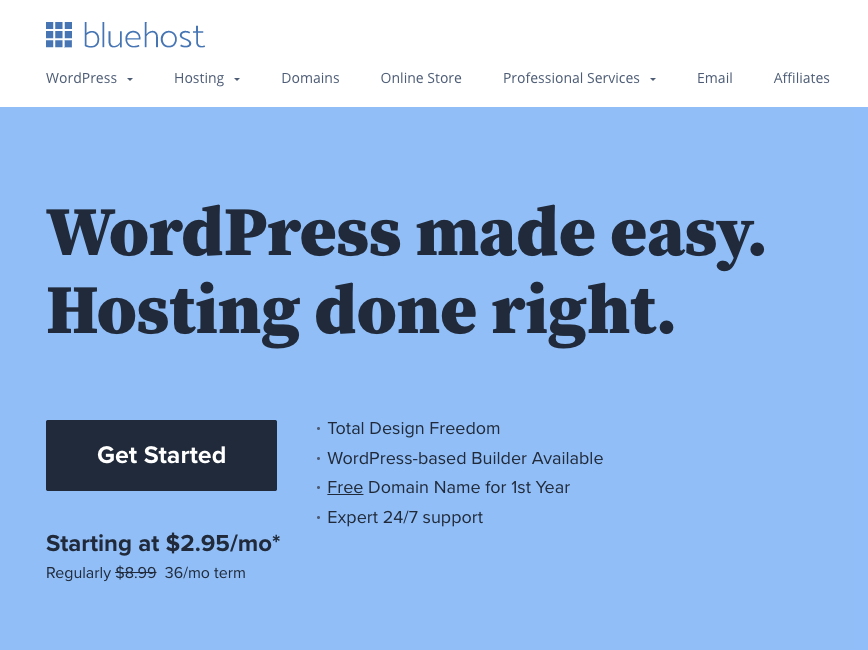
Step 1. Sign up for a hosting plan
First, we need some space on the internet to put your blog. A hosting company takes care of serving your pages to users. If you’re starting out, I recommend using the budget-friendly yet capable Bluehost.
Having your own hosted space lets you do whatever you want. A paid host doesn’t care if you put ads on your blog, or customize it with plugins, or anything like that.
It’s kind of like having your own plot of land on the internet. You can build your own house on it. And then you can add more rooms later, or even tear it down and build a bigger more awesome house on top of the original foundation. You can’t do that with just a rental space (like some of those free blogging platforms).
There are many different hosting companies, but I like to recommend Bluehost, with which I have an affiliate partnership. Bluehost is what I used myself when I started my first blog.
If you use my link to sign up, you get a special offer of just $2.95 a month.
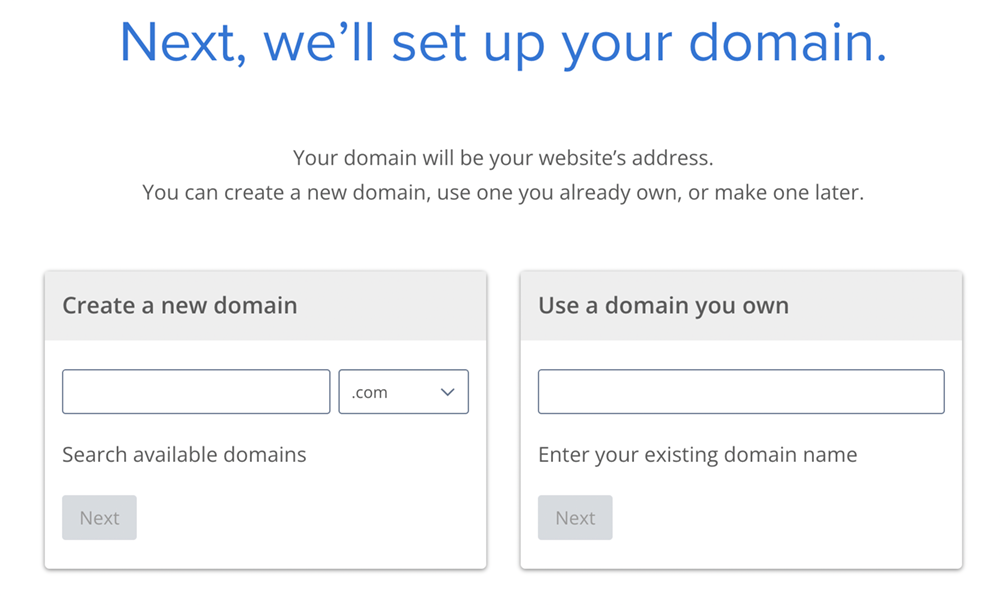
During the signup process you can choose a free domain name. Think of a name that isn’t taken yet and that reflects the themes or the travel style you most want to write about.
If you’re not sure about the name yet, you can skip this step for now and decide later.
In most cases, there’s no need to bother with their premium plans; if you just sign up for their basic plan, it’ll be good enough for a brand-new blog. You’ll get 10 GB of storage, unlimited bandwidth, unlimited email addresses, and so on. If you need more you can always upgrade in the future.
Bluehost also gives you your own domain name for free (well, for the first year at least).
Step 2. Install WordPress
All signed up? Great!
Now that you have a hosting account, let’s install WordPress.
After signing up at Bluehost you’ll end up in your account’s control panel. Here, simply select ‘My Sites’ and click ‘Create Site’.
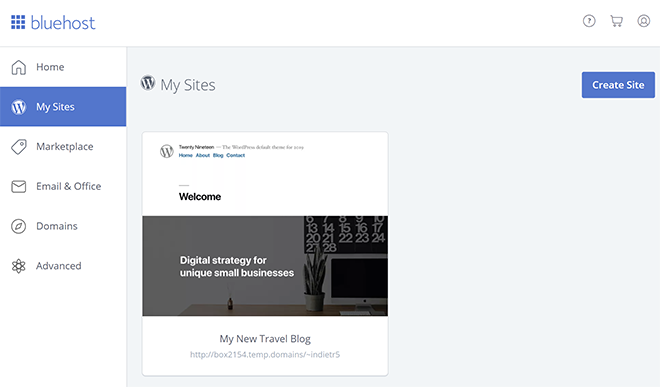
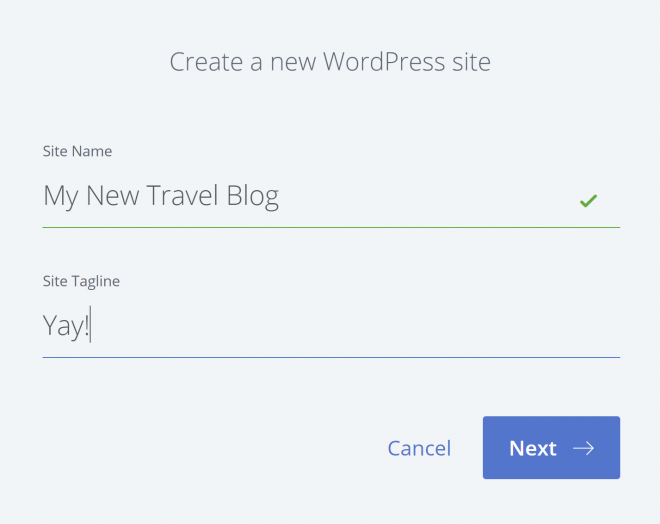
Give your site a name, and in the next step, select your domain name. You can just leave the field where it says Directory empty. Then press “install”.
The set-up might take about 5 minutes — time to make yourself a cup of tea or tell a good travel story to your cat. Come back to your computer and WordPress should be all set up now.
Step 3. Sign in to your blog!
Okay, there isn’t really a step 3. You’re basically finished now.
The technical side of starting a travel blog really isn’t so complicated. There are just a few tweaks you might want to make at this point.
Go to www.yourdomainnamehere.com/wp-admin/ and lo and behold, your WordPress admin awaits you.
Go to Appearance > Themes if you want to change the visual look of your blog. There are lots of nice free themes to choose from. Don’t worry, you can still easily change this later.
You might also want to go to Settings > General and change the name and the tagline.
Another small thing I recommend is going to Settings > Permalink and selecting the option “Post name” if it isn’t already. This ensures the internet addresses for your posts will look nice and clean.
Ta-da, your travel blog is now ready!
Later, you’ll probably want to add an About and Contact page, or enhance your WordPress install with some extra plugins. But those are later steps.
Rest assured, by having a self-hosted WordPress installation, your blog is now future-proof and can be expanded and even monetized in the future. And you’ll be totally in control of your own site.
Want to give your travel blog a flying start? Then check out my video with the 3 most important beginner tips:
Why you 100% need a domain name
One more thing that’s worth explaining: it’s super important to have your own domain name. Even if you’re just doing a blog for fun (for now).
Here’s why.
Firstly, if your web address looks something like http://mytravelblog.wordpress.com it’s hard to remember and looks amateurish.
But the bigger problem? It’s that you won’t be building up any Domain Authority.
Think of it this way: when Google sees that you’re posting good content and getting links to your blog from other sites, it’s kind of keeping score in the background. The more authoritative sites Google sees linking to you, the more Google believes you’re authoritative as well.
But if you are hosted under a shared domain like wordpress.com or medium.com, all those imaginary ‘points’ you’re accruing actually go to that domain, which you don’t own.
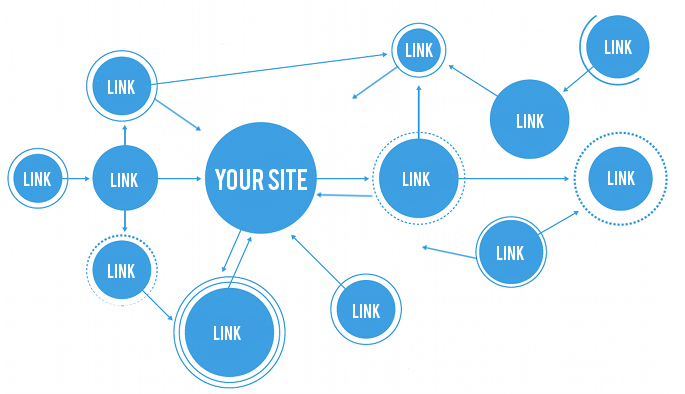
Hosting your blog on your own domain means you’re immediately building up ‘cred’ and making it easier to rank more highly on search engines later.
Active domains with links to them can also become quite valuable and can even be sold or auctioned.
These days it doesn’t matter too much if your domain is a .com or has some lesser-known extension as people will still find you through search engines. What matters most is that you simply own the domain.
As I mentioned earlier, if you sign up at Bluehost you’ll get a free domain name. If you prefer to get your domain elsewhere, I recommend using Hover.com, which is a nice no-nonsense domain registrar that doesn’t try to upsell you anything.
But getting your domain through Bluehost is a little easier, as then you don’t have to manually connect your domain to your hosting account, which can get a little technical.
How to choose a name for your travel blog
Honestly… this may well be the trickiest part to getting started.
It can be tough to find a name for a blog that isn’t already taken, so you may have to get a bit creative.
Just one piece of advice: consider a blog name that doesn’t have your own name in it. Personally, I just think this gives you more flexibility. Maybe you’ll want to share your blog with other authors one day, develop it in new unexpected directions, or even sell it. It’s nice to keep your options open and not tie it exclusively to your name.
Sometimes I wish I had come up with some astoundingly witty name that shows me to be an unequivocal genius at naming things. I ended up calling my blog Indie Traveller, which is hardly inspired. But it is, at least, somewhat easy to remember.
It also says something about the way I like to travel and it isn’t just limited to myself or my name. In the end, I’m happy that I didn’t go with Wandering Marek, or something to that effect, as I really wanted to have a versatile brand.
Still, if personal branding is important to your blog, then using your own name could still be a good move.
It’s worth having a bit of a brainstorm and pitching names to a few people and seeing what they think before buying your domain name.
Okay… what’s next?
Your journey as a travel blogger is only just beginning!
Here are some other posts on my other blog to help you out:
- How Do Travel Blogs Make Money?
- Is It Too Late To Start A Travel Blog?
- How To Succeed In Travel Blogging: Some Heartfelt Tips From 5 Years In
- 10 Ways To Grow Your Travel Blog (From 0 to 100,000+ Monthly Visitors)
Some links may be affiliate links, meaning I may earn commission from products or services I recommend. For more, see site policies.


Thanks for this detailed guide, Marek. WordPress is a great open source software for blogging, but it has its limitations/downsides. I faced many problems when I first started using it. It is hard to grasp initially, but as I used it daily for a month or so, I got a hang of it. The other platforms like Wix (esp. Wix) is very intuitive and requires no understanding of tech jargons. The best part, I love about WordPress, is the ease of customization and enhancements it allows. With the arrival of AI, some other better alternatives of WordPress may evolve in future.
Very useful and straightforward guide for anyone looking to start a travel blog! The step-by-step instructions make the process easy to follow, even for beginners.
Thanks for covering this topic and it will really help the beginners.
Hi Marek,
Thanks for this blog post! Really helpful, especially to new travel bloggers
Thank you so much for the useful guide! I’m also thinking about starting a travel blog and naming the host is really hard! Btw, I think you misspelled “early days”, you had it as “daus”, not sure if it’s intentional but wanted to point out 🙂
Oops, thanks, that’s corrected now! 🙂
Hey, currently I’m working on travel website https://www.travelindiaopedia.com/
It is fun to work but sometimes I get hopeless because of no organic traffic till date… good knowledge and great effort.
It’s still much too early… new sites are often not recognized by Google until 6 months or more. 🙂 Good luck!
Hey, Buddy. Thanks for sharing the information. I am a photographer and also want to start a travel blog, but I was confused. But now I got all mu answers. Thanks
You have provided a lot of great information and tips. And it helps me a lot in my way to be a great blogger. Thanks a lot.
There is a lot of great information available in this article for those who start blogging. Thank you very much for this beautiful article.
Marek,
Thanks for the blog. I ma still confused. I just started my blog website (through dynadot) and am still not sure if I still need WordPress and why. I went on their website. It seems like wordpress is another hosting company. I did not see any option to install WordPress. What am i missing?
Hope to hear from You!
Dynadot is a hosting company, while Dynadot Website Builder is a (simple) content management system. Similarly, Bluehost which I mention here is a hosting company, while WordPress is a content management system offered by many hosts including Bluehost (or that you can install yourself).
I’ve not used Dynadot Website Builder but it’s likely mostly intended for basic portfolio or small business sites, similar to Wix or Squarespace. WordPress is most widely used among bloggers as it allows more customizability, use of plug-ins, etc. But the choice of platform is ultimately yours.
Thanks a lot Marek. I need your opinion if you don’t mind: Dynadot offers access to WordPress through their VPS plan ($10/month)
https://www.dynadot.com/hosting/vps.html
Would you recommend me that or to move my domain to Bluehost and get WordPress through them?
My main recommendation is to get self-hosted WordPress, so if you can get it that way, great! I do recommend Bluehost here for anyone who’s starting out, but if you’re already set up at another host and you’re happy with them, then sticking with them might just be easier. 🙂
Nice Piece of Information,it clearly mentioned everything that you need to start for a blog from scratch.
Thanks
Hey Marek, thank you for sharing! I just started my travel blog http://www.stephventure.com and this post is REALLY helpful!
Thanks for your detailed answer Marek, you just helped me save lots of time.
Great insights, advice and straightforward information about how to get your travel blog started! Thank you for sharing and this confirms our own decision to launch our “niche” travel blog in the next couple of months!
Hi Marek. Thank so much for the article. I like telling about my trips on my WP.com, but the site is not well-known. Hope these tips would help my new site.
thanks!! i started my own
https://www.letsexplorenepal.com/
Thanks a lot for sharing information. Nice stuff.
Thank you so much for this information! This is my first time on your blog, and I usually jump from one post to the next without reading much. But, I was really drawn in to your writing.
I noticed that happens more often when the writer goes off topic and starts making the post about themselves. Talking about yourself and sharing your own story isn’t distracting as long as it supports the information or point of the post. It starts becoming distracting when it isn’t necessary.
I’ll be referencing this post when I start up my own blog once I finish developing my WP theme!
Thanks again! (:
Glad the enjoyed reading this Catherine. I agree with you… and I think this is actually an element that can make a travel blog more successful!
Good luck with your blog! 🙂
the post was very informative. It is true that now there are many travel blogs out there. SO we need to find a specific niche .
I also had one question that the hosting plan we buy from bluehost also offers us a free domain name. I wanted to ask that the domain we get is for lifetime validity or if we have to renew the domain name?
It would be great if you could answer my question?
It’s basically a free bonus for whatever initial period you purchase (for example 1 or 2 years). After that there’s an annual domain registration fee. For a .com this is usually around $10 a year.
Hey Marek, Thanks for the post.
I like your alternative take on possibly waiting to find your niche and instead seeing if maybe a niche finds you. It makes sense. Experiment with a variety of posts, see which ones get traction, understand why, and follow that route down into your niche.
But don’t you think that right from the start you need to have an idea of who your target “avatar” reader will be? I think you gotta write to somebody specific and not a general audience or else what you write will have no personality and resonate with no one.
Quick question on hosting: Are you still on the basic Bluehost plan? If not, when did you upgrade and how did you know it was time to upgrade?
Good question. I moved to a dedicated virtual server (or VPS) at Linode.com roughly once I broke past 100,000 visitors a month. I simply noticed my pages were getting slower and had some bad Google PageSpeed reports. Bluehost also offers VPS options (and I believe you can seamlessly upgrade to them from a basic account) but my server admin went with Linode for nerdy reasons. I still recommend Bluehost for anyone starting out.
Totally agree that it’s worth at least having a certain audience in mind. You definitely have to start with some basic assumptions about what you’ll write and who you’ll write it for. I’ve just noticed that many bloggers who say you need a perfectly defined niche didn’t start out with one themselves at all. It’s always possible to pivot or even rebrand entirely.
Thanks for your detailed answer Marek, you just helped me save lots of time. Hope we might meet some day an share experiences!
All the best and safe travels!
Thank you for mentioning us in a great monetization post, Marek!
Mediavine is known for helping online publishers monetize their existing content through digital advertising that doesn’t slow down sites or destroy audience experience. But ads are just the beginning. Our mission is to create sustainable businesses for digital content creators. We are committed to providing education to publishers on a wide variety of topics from social media to SEO and helping them diversify their income streams with our influencer marketing department and other resources (like your post!)
Our threshold to work with a site is 25k monthly sessions and we’re here to answer any questions at publishers@mediavine.com.
Thanks again!
— Susannah at Mediavine
Hey Susannah. I can honestly say that Mediavine is the only ad company I’ve truly enjoyed working with. Keep up the great work! 🙂
Hi Marek,
Congratulations for the wonderful job your doing!
I want to thank you for the helpful articles you are writing and ask for an advice regarding starting a travel blog. Do you think Wix is a good alternative to WordPress? and How do you get sponsorship (discount for accommodation), is there a communication strategy that you could share?
Thank you and hope you’ll have the time to answer,
Safe travels,
Robert
Hi Robert. I think Wix is great if you want to build e.g. a portfolio or a site for a small business with easy to use tools, and you don’t care that Wix owns your data. I don’t think it’s ideally suited to building a content-driven site or blog though. One of the disadvantages of Wix is that it’s proprietary, whereas WordPress is an open platform with a huge ecosystem around it. You could probably still make it work with Wix, but virtually all major bloggers I know use WordPress – it’s maybe not quite as beginner friendly sometimes (largely depending on what theme you use), but it ultimately offers way more control and flexibility.
For outreach, focus on answering the question ‘what will they get out of it’ as best as you can. It’s not about you getting the freebie, it’s about them receiving tangible PR or marketing benefit. Just saying ‘you’ll get exposure’ is typically not enough; suggest specific content or social media coverage you can offer them, specify what this includes (is it just a quick mention? or an article with photos? will you link to their site with a do-follow link?), and if possible offer some information on your audience (age, type of traveller). You can try a much simpler pitch if you’re just after a free stay in a hostel or something (as this costs them so little), but for anything more significant you have to make a marketing case.
Hope this helps!
Great post Marek! Thanks so much for putting this together. It will come in handy with my blog writing.
Hi Marek,
I´ve just read a lot of your tips and guidance and firstly, thanks a lot. I´ve been blogging for a couple of years but so inconsistently that it´s more like just a few months. Anyway, I have written more consistently the last month and feel motivated to keep it going. My viewing figures are currently in the low thousands which is actually a huge increase for me! Anyway, I pay for my domain annually and there my page looks slightly more professional in terms of the URL, however I am still using wordpress.com. I don´t use any hosting platform currently. What I want to know essentially, is how much you´d recommend upgrading now, even though I have no monetary interest as far as I know,and transferring all my content over rather than letting the pile get bigger and bigger?! I do want to make a leap from just personal blogging, does upgrading just make things easier IF this happens rather than providing any increase in likelihood of it happening? Sorry if this post is all over the place, I´ve been reading tips for about ten hours straight!
Hey Gavin. You could stay on WordPress.com for now if you are happy with the functionality. If you have no monetary interest in it then you might be fine with what that platform offers. However, if you want to have any commercial activity at all, then this is not allowed on WordPress.com (it’s against terms of service, and often this gets blocked even if you tried). You also can’t do more advanced stuff with your templates or plugins.
It is possible to migrate your content from a WordPress.com account to a self-hosted account in the future. Just count on this being a bit of a project. You’ll need to extract the content from one site and insert it into the other, and point the domain to your new site as well.
Hey Marek,
Is there a device you would recommend for traveling and blogging purposes. I don’t want to lung around my laptop so I’m looking to get something that I can use for these purposes before I leave on my year long trip. Something light but that will also have the capacity and storage for any software I might need to download like WordPress.
Hmm, well, you could consider an Android tablet. Put in a big SD card, or learn how you can attach an external drive to it where you can store things like photos etc. Or you could get a small lightweight laptop (some suggestions here).
Marek,
Thanks for the advice. I’ll look into that link.
Used this advice a little bit ago and went for it! Thanks for the post 🙂
-Julia
http://Www.cultwanderer.com
Have seen the travel blog success course, let me look at Fizzle. Thank you for sharing however have you used any of these?
You mean Fizzle? I watched their videos almost nonstop before I launched my blog. 🙂
Hey, IMHO if you want a fast and easy blog, you should use Medium
There is no cost and the default on the blog are really beautiful 🙂
I love Medium though by design it’s very limited with customisation/templating (which is something many people do want for a travel blog), and it’s bad for ever monetising it (they don’t allow it). I agree Medium could be a great option for some people though!
Hello, Marek!
Sorry for that late comment but still there is one thing I’d like to ask about Word Press.
Should one know PHP to run it properly?
Thanks for that comprehensive post!
No knowledge of PHP is needed (unless maybe you want to do rather advanced stuff). If you use plugins, you can build a site with WordPress without coding knowledge.